Kontrol LED Arduino Uno di Proteus Menggunakan Blynk

1️⃣ Tujuan Praktikum
Setelah praktikum ini, peserta mampu:
- Mensimulasikan Arduino Uno di Proteus
- Mengontrol LED secara ON/OFF dari aplikasi Blynk
- Memahami konsep IoT control berbasis cloud
- Mengintegrasikan software simulator + mobile app
2️⃣ Dasar Teori Singkat
🔹 Arduino Uno
Arduino Uno adalah board mikrokontroler berbasis ATmega328P yang banyak digunakan untuk pembelajaran dan prototyping IoT.
🔹 Proteus
Proteus adalah software simulasi rangkaian elektronik yang mendukung simulasi Arduino dengan file .hex.
🔹 Blynk
Blynk adalah platform IoT yang memungkinkan kontrol perangkat melalui smartphone menggunakan:
- Virtual Button
- Cloud Server
- Token autentikasi
📌 Catatan Penting
Proteus tidak bisa langsung terhubung ke internet, sehingga komunikasi Blynk dilakukan melalui Serial / Virtual Terminal (simulasi konsep).
3️⃣ Alat dan Bahan
🔧 Software
- Arduino IDE
- Proteus 8 Professional
- Aplikasi Blynk IoT (Android / iOS)
🔩 Komponen di Proteus
- Arduino Uno
- LED
- Resistor 220Ω
- Virtual Terminal
- Ground (GND)
4️⃣ Diagram Rangkaian (Proteus)
📌 Koneksi LED
| Arduino Uno | Komponen |
|---|---|
| Pin D13 | Anoda LED |
| GND | Katoda LED (via resistor 220Ω) |
📌 Virtual Terminal
| Arduino | Virtual Terminal |
|---|---|
| TX (D1) | RX |
| RX (D0) | TX |
| GND | GND |
5️⃣ Konfigurasi Blynk
🔹 Buat Template
- Buka aplikasi Blynk IoT
- Daftar diwebnya Blynk

- Buka Email untuk Create Account

- Check Inbok Untuk Konfirmasi Setelah Create Account
- Daftar diwebnya Blynk
- Create New Template
- Login ke Blynk
- Click on New Template

- Pilih Arduino sebagai hardware.

- Pilih Wi-Fi sebagai tipe koneksi
- Buat nama templatenya (misal : bisaioti_blynk).
- Save the template.
- Hardware: Arduino Uno(Untuk Mengintegrasikan Proteus dan Blynk maka perlu beberapa file yang harus kita download yaitu:)
-
Download Blynk Library
- silahkan buka github
- download blynk library ( https://github.com/blynkkk/blynk-library)

- Install Comm0Comm (https://lcgamboa.github.io/picsimlab_docs/stable/Com0comInstallationandConfigurationWindows.html)

- Download com0com dan install
-
Menambahkan Library Blynk Ke Arduino IDE
- Open Arduino IDE.
- Go to Sketch > Include Library > Add ZIPLibrary

- Pilih Librarynya.

- Click OPEN
-
-
Setting & Konfigurasi Blynk
- Klik Devices > New Devices


- Copy the Authentication Token

- Buka Arduino sketch and paste the token di program
- Pastikan sekali lagi token dari blynk sudah benar

- Edit Blynk dashboard

- Add switch

- Configure switch parameters

- Create datastream

- Virtual pin

- Virtual pin v0

- Create

- Chose V0

- Save and apply

- Klik Devices > New Devices
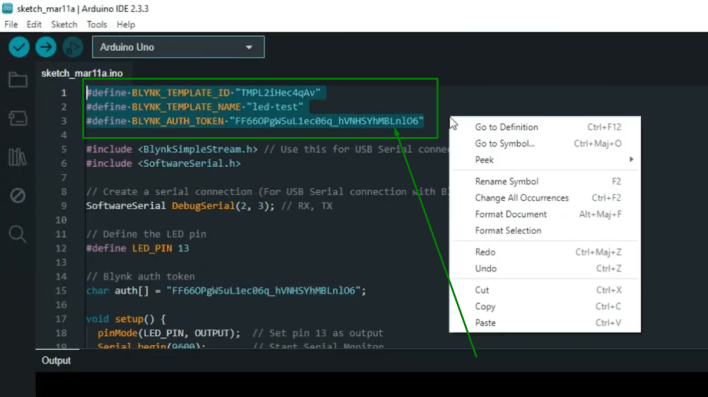
6️⃣ Program Arduino
📌 Sketch Arduino
#define BLYNK_TEMPLATE_ID ""
#define BLYNK_TEMPLATE_NAME ""
#define BLYNK_AUTH_TOKEN ""

#include <BlynkSimpleStream.h> // Use this for USB Serial connection
#include <SoftwareSerial.h>

// Create a serial connection (For USB Serial connection with Blynk)
SoftwareSerial DebugSerial(2, 3); // RX, TX

// Define the LED pin
#define LED_PIN 13

// Blynk auth token
char auth[] = "";

void setup() {
pinMode(LED_PIN, OUTPUT); // Set pin 13 as output
Serial.begin(9600); // Start Serial Monitor
Blynk.begin(Serial, auth); // Initialize Blynk using Serial
}

void loop() {
Blynk.run(); // Run Blynk process
}

// Blynk function to control the LED
BLYNK_WRITE(V0) {
int switchState = param.asInt(); // Read switch state from Blynk
digitalWrite(LED_PIN, switchState); // Turn LED on/off
}
📌 Generate File HEX
- Arduino IDE → Sketch
- Export Compiled Binary
- File
.hexakan digunakan di Proteus
7️⃣ Langkah Simulasi di Proteus
- Buka Proteus → New Project
- Menambahkan Komponen di Proteus
- Open Proteus 8.
- Add an Arduino Uno.
- Add a virtual COM port and connect
- TX (Transmit) of the COM port to RX (Receive) of Arduino.
- RX (Receive) of the COM port to TX (Transmit) of Arduino.


- Konfigurasi Virtual Serial Port
- Install, Kemudian pilih komponen

- Lounch Setup

- Konfigurasi Port

- Install, Kemudian pilih komponen
- Modifikasi Script Blynk
- Open the Blynk script file


- Modify the port number to match your virtual COM port (e.g.,
COM4).

- Pastikan server port benar (
8080or80).

- Open the Blynk script file
- Upload Code ke Arduino
- Open Arduino IDE.

- Compile and upload your sketch.

- Ensure the correct board and port are selected.
- Open Arduino IDE.
- Jalankan Proteus dan blynk Script
- Right click the blynk-ser.bat and run as admin

- Open Proteus.
- Click Run Simulation.
- Right click the blynk-ser.bat and run as admin
1️⃣1️⃣ Pengembangan Lanjutan (Opsional)
- Ganti LED dengan Relay
- Gunakan ESP32 (real hardware)
- Tambahkan monitoring status LED
- Integrasi ke Node-RED Dashboard


